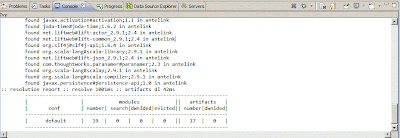
- Make sure you have Eclipse with WTP (comes with the default Java EE package), Scala IDE, and IvyDE installed. You can opt not to use IvyDE for library management by adding jars manually. For that you can go to MvnRepository to see the required dependencies. A basic Lift project usually relies on either lift-mapper or lift-jpa as a single parent dependency.
One thing to note here is this issue where Scala compiler generates version-specific byte-code. This generally means that if you use Scala 2.9.1, you have to compile your project against a version of Lift that's compiled against Scala 2.9.1 and all the Lift dependencies must also be compiled against that version of Scala. Lift packages come with their version as their name's suffix, thus if you use Scala 2.9.1 you would pick lift-mapper_2.9.1 as the basis of your dependency resolution. - In the IDE create a new Dynamic Web Project.
Because Lift works with any servlet container that implements the Servlet 2.5 specs, chances are your favourite container will work just fine too. Personally I would recommend using the latest release of JBoss AS. It's quite as blazing fast as advertised and perhaps you might want to use some bleeding edge Java EE specs like JPA, CMT, and EJB to help with your software architecture. - To add Scala nature, open file .project and do the following changes:
- Add a buildCommand with name org.scala-ide.sdt.core.scalabuilder.
- Add a nature with value org.scala-ide.sdt.core.scalanature.
- In project→Properties→Java Build Path, add Scala libraries. Also add it to project→Properties→Deployment Assembly.
- Add Lift packages and their dependencies, although...
- If you have IvyDE installed:
- You can skip this if the default ibiblio Maven repository works ok for you. It's most of the time really slow for me so I tend to use Antelink's instead. To do this, create a file named ivysettings.xml (could be anywhere in your project) containing:
<ivysettings>
<settings defaultResolver='antelink'/>
<resolvers> <ibiblio name="antelink" root="http://maven.antelink.com/content/repositories/central/" m2compatible="true"/>
</resolvers>
</ivysettings> - Create an Ivy file using the wizard and add this:
<dependencies>
<dependency org="net.liftweb" name="lift-jpa_2.9.1" rev="2.4">
<exclude org="org.scala-lang" matcher="glob" name="scala*" />
</dependency>
</dependencies> - In project→properties→Java Build Path→Libraries click Add Library and select IvyDE Managed Dependencies. Set the Ivy File, check Enable project specific settings, and set the Ivy settings path. Also add this Ivy dependency to project→Properties→Deployment Assembly. When you're done, Ivy will probably take a while to resolve your dependencies. You can see its progress by displaying the Ivy Console.
- A Lift web project generally has this kind of folder structure:
src
|_main
|_resources
|_scala
|_webapp
|_images
|_static
|_templates-hidden
|_WEB-INF|_test
|_scala
To do this, you will need to remove the default WebContent directory and move everything inside it into src/main/webapp. You will also need to, in project→Properties→Java Build Path→Source, edit accordingly to point to src/main/resources as well as src/main/scala. - Inside src/main/webapp/WEB-INF you need a web.xml. This is usually generated automatically upon project creation. Add a filter with name LiftFilter and class net.liftweb.http.LiftFilter and a filter-mapping with name LiftFilter and url-pattern /*. You can change the name and url-pattern according to your needs.
- The LiftFilter by default looks for a class named Boot inside the package bootstrap.liftweb (src/main/scala/bootstrap/liftweb/Boot.scala) and executes the boot method (def boot() {...}).
But you can also have this class anywhere else in your classpath. To do that your Boot class needs to extend net.liftweb.http.Bootable and add the following entry in your web.xml's LiftFilter:
<init-param>
<param-name>bootloader</param-name>
<param-value>path.to.your.Boot</param-value>
</init-param> - Setting up logging.
- I have only ever used Logback so this is the logging backend that we'll use here. I would advise against using IvyDE to manage your Logback dependency because by default Logback depends on a lot of other libraries that you might not even use in your Lift web project (such as Groovy). You can instead manually download Logback and add logback-access, logback-core, and logback-classic to your build path.
- Now you want to setup your Lift's default logging back end. First add a logback.xml in src/main/resources. Logback configuration doesn't have a schema so don't bother looking. Do open this link for an example of the most basic Logback configuration. Next open your Boot class and add the following inside the boot method:
LiftRules.getResource("/logback.xml") match {
case Full(url) => Logger.setup = Full(Logback.withFile(url)); case _ => println("Logback configuration not found.")
} - Next you can continue by setting up class resolution and site map and creating your first page by utilising templates and binding. A Lift tutorial book I would totally recommend is Lift in Action by Timothy Perrett.
- Lastly you can build, test, and deploy your web application the way you normally do it in Eclipse. Managing and configuring your web server and deployment are probably much easier using their default Eclipse adapter plugin compared to using Maven.
enthusiastic posts on software development, mostly back-end programming in Scala and Java
Saturday, April 7, 2012
Lift as Eclipse WTP Project
Some of us--we've never used Maven, let alone SBT. We're used to Eclipse's default build, test, deploy, and reload features. Why limit the choices to starting up a Lift web project by requiring knowledge of either. So here goes it:
Subscribe to:
Post Comments (Atom)


No comments:
Post a Comment